Keeping your fan clean is important for better air flow and to keep your home free of dust. In this guide, I will show you how to clean both ceiling fans and oscillating fans in a few easy steps. Let’s get started!
Why Cleaning Your Fan is Important
Cleaning your fan is not just about making it look nice. Here are some reasons why you should clean it regularly:
Better Air Flow: Dust can block air from moving properly, making the fan less effective.
Healthier Air: Dust and allergens in the fan can spread around the room, causing allergies.
Fan Longevity: Cleaning your fan helps it last longer and work better.
Now, let’s go over how to clean your fan the right way.
How to Clean a Ceiling Fan
Step 1: Turn Off the Power
First, always make sure your fan is off. It’s safer to turn off the power at the wall switch or circuit breaker before you start cleaning.
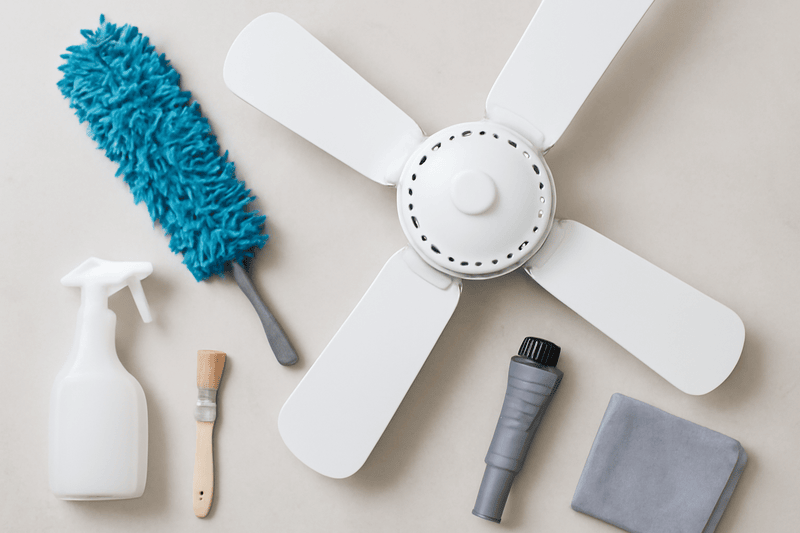
Step 2: Get Your Cleaning Supplies
Here’s what you’ll need:
A step stool or ladder
A microfiber cloth or duster
A vacuum cleaner with a brush attachment
A gentle cleaner or just water and dish soap
A soft brush or paintbrush
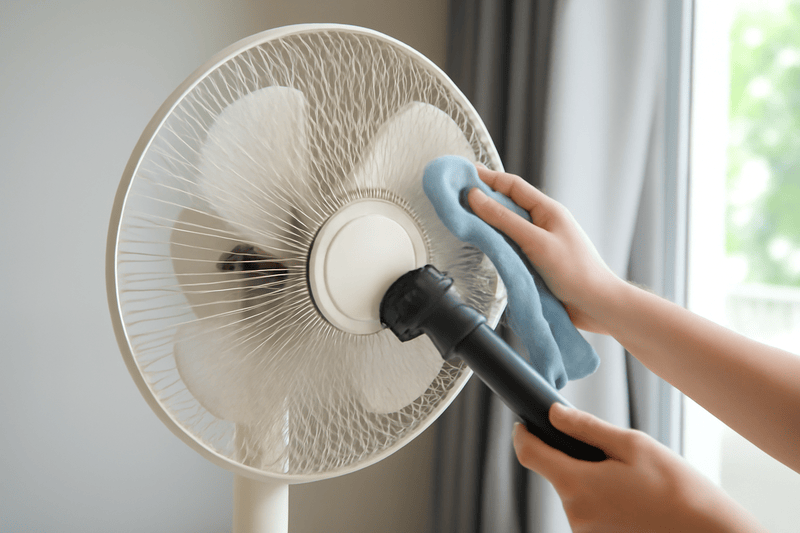
Step 3: Dust the Fan Blades
Use your microfiber cloth or duster to wipe the fan blades. If there’s a lot of dust, lightly dampen the cloth with water. Be careful not to make it too wet.
If the dust is stubborn, use a soft brush or paintbrush to clean between the blades.
Step 4: Clean the Motor and Other Parts
Now, use your vacuum with a brush attachment to clean the motor and ceiling parts. Fans can collect a lot of dust around the motor, so it’s important to get in there.
Step 5: Wipe the Blades Again
After dusting, wipe the fan blades again with a dry cloth to remove any leftover dust and moisture.
Step 6: Final Touch
To make the fan blades shiny, I like to use a dry microfiber cloth to give them a quick buff.
How to Clean an Oscillating Fan
Cleaning an oscillating fan is even easier. Here’s how I do it:
Step 1: Unplug the Fan
Make sure the fan is unplugged before you start cleaning.
Step 2: Take the Fan Apart
Remove the front grill and the fan blades. Most oscillating fans have easy-to-remove parts, so this should be simple.
Step 3: Clean the Blades and Grill
Use a damp cloth to wipe the fan blades and grill. You can also mix water and dish soap for a deeper clean. Wipe all parts carefully.
Step 4: Vacuum the Base
Don’t forget to clean the fan’s base. Use your vacuum with the brush attachment to remove dust and dirt from the fan’s stand.
Step 5: Put the Fan Back Together
Once everything is clean and dry, put the fan back together. Now, it’s ready to use!
Tips to Keep Your Fan Clean Longer
Cover the Fan: If you’re not using your ceiling fan, cover it with a cloth to prevent dust from collecting.
Regular Dusting: Dust your fan once a month to keep it clean.
Check the Fan Blades: After cleaning, check that the blades are even. Misaligned blades can affect how well your fan works.
Conclusion
Cleaning your fan is easy and can make a big difference in your home. Not only will your fan work better, but you’ll also enjoy cleaner air. If you don’t have the time to clean your fan, let me help! As a professional cleaner, I offer services to keep your home dust-free and fresh.
Cleaning your home doesn’t have to be stressful! With the right checklist, you can easily make sure your home stays neat and fresh. Whether you’re busy with work, taking care of your family, or just want some help, having a cleaning routine can make a huge difference. As a professional cleaner, I’ve put together a simple, easy-to-follow cleaning checklist for Bronx residents, so you can keep your home in great shape!
Why You Need a Cleaning Checklist
In the Bronx, people live in different kinds of homes—apartments, houses, and even townhouses. No matter where you live, you want your home to feel clean and comfortable. A good cleaning checklist helps you stay on track and saves you time. Plus, a clean home can make you feel better and even help improve your health by reducing dust and germs.
Your Perfect Cleaning Checklist
Let’s break down the perfect cleaning checklist for each part of your home!
1. Living Room
Dust All Surfaces: Wipe down your shelves, tables, and TV. Use a microfiber cloth for the best results.
Vacuum or Sweep: Make sure your floors are clean and free of dirt.
Organize: Pick up any clutter to make your living room feel more spacious.
2. Kitchen
Wipe Down Counters and Cabinets: Clean up any crumbs, spills, and grease from your kitchen surfaces.
Clean Appliances: Don’t forget to clean your fridge, microwave, and stove both inside and out.
Sanitize the Sink: Make sure your sink is clean and free of bacteria.
Mop the Floor: Mop your kitchen floor to get rid of any sticky spots or spills.
3. Bathroom
Scrub the Toilet: Make sure your toilet is disinfected and clean.
Clean Mirrors and Faucets: Wipe down all the glass surfaces and faucets for a shiny look.
Scrub the Tub or Shower: Get rid of soap scum and grime in the tub or shower.
Mop the Floor: Keep your bathroom floor spotless by mopping up water or dirt.
4. Bedrooms
Dust Surfaces: Wipe down tables, shelves, and windowsills.
Change Bed Linens: Fresh sheets make the room feel cozy and clean.
Vacuum or Sweep: Clean the floors to remove dust, dirt, and allergens.
Organize the Closet: Tidy up your closet to create more space.
5. Windows and Glass
Wash the Windows: Clean your windows both inside and outside for a crystal-clear view.
Wipe Down Glass Surfaces: Don’t forget mirrors, tables, and glass doors.
6. High-Traffic Areas
Clean Entryways: The first thing people see when they enter your home should be clean!
Sanitize Doorknobs: Clean doorknobs to stop germs from spreading.
Extra Cleaning Services to Add to Your Checklist
Sometimes regular cleaning isn’t enough. Here are a few extra cleaning services that can help make your home extra clean:
Move-In/Move-Out Cleaning: Whether you’re moving in or out, this service ensures your space is spotless.
Spring Cleaning: A deep clean to refresh your home after a long winter.
Post-Event Cleaning: Hosting a party or event? Let us handle the cleanup afterward!
Why Hire a Professional Cleaner in the Bronx?
While it’s great to do some cleaning yourself, hiring a professional cleaning service can make your life a lot easier. Here’s why:
Expert Cleaners: We know how to get your home looking spotless and can handle any cleaning challenge.
Save Time: We take care of everything, so you don’t have to spend your time cleaning.
Healthier Home: We help reduce germs, dust, and allergens that can affect your health.
If you want a sparkling clean home without the stress, professional cleaners can help. Whether it’s a one-time deep clean or regular service, we’ve got you covered.
Conclusion: Keep Your Bronx Home Clean and Fresh
With this checklist, you’re ready to keep your home clean and tidy all year long. Whether you’re doing it yourself or hiring a professional cleaning service, the key is to stay on top of things. If you need help with a deep clean or regular service, don’t hesitate to reach out to us at Gloria Cleaning.
Keeping your home clean between professional cleanings doesn’t have to be difficult. With a few simple steps and some regular attention, you can maintain a tidy home until your next cleaning. Here are some easy tips from the experts to help you stay on top of it!
1. Clean High-Traffic Areas First
Areas like the kitchen, bathroom, and hallway get dirty quickly because they are used a lot. Make sure you wipe down surfaces like countertops and sinks daily. This will help prevent dirt and grime from building up. If you need help with deep cleaning in these areas, we offer Residential Cleaning Services to make sure every corner is spotless.
2. Declutter Every Day
Clutter can make your home look messy, even if it’s clean. Take a few minutes each day to pick up things like clothes, toys, and random items lying around. The less clutter you have, the cleaner your home will feel. If you need help organizing or decluttering, we offer Decluttering Services that can help get your space organized.
3. Vacuum and Clean Upholstery
Furniture like sofas and chairs can collect dust, pet hair, and crumbs. Vacuuming them once a week can help keep things clean. If there’s a spill, clean it up as soon as possible to prevent stains. If you need a more thorough cleaning, we can handle it with our Upholstery Cleaning service.
4. Keep Your Floors Clean
Floors get dirty quickly, especially in high-traffic areas. Sweep or vacuum them regularly to keep dirt from building up. You can also mop floors once or twice a week to keep them looking fresh. If you’re looking for extra tips on floor care, check out our How to Clean the Bottom of a Swimming Pool for some helpful cleaning tips.
5. Maintain Good Air Quality
The air in your home can affect how clean it feels. Use air purifiers or open windows to bring in fresh air regularly. Dust air vents and change air filters each month. For help with eliminating odors, we offer Pet Odor Removal to keep your home smelling fresh.
6. Use Natural Cleaning Products
Instead of using harsh chemicals, try natural cleaning solutions like vinegar, baking soda, or lemon. They work great for cleaning different surfaces, and they’re safe and eco-friendly. If you need a stronger cleaner for tough messes, check out our Heavy Duty Cleaner for the most challenging jobs.
7. Deep Clean Once a Month
In addition to daily cleaning, give your home a deep clean once a month. Focus on places you don’t clean often, like behind the refrigerator or under the bed. You can also book our Post Construction Cleaning if you need help with a more detailed cleaning.
8. Create a Cleaning Schedule
A cleaning schedule helps you stay on track. Make a plan for daily, weekly, and monthly cleaning tasks so that you don’t forget anything. This way, your next professional cleaning will be easier and more efficient. If you’d like a detailed cleaning plan, contact us today for help!
Final Thoughts
With these simple tips, you can keep your home looking clean and tidy between professional cleanings. A little daily effort goes a long way, and if you need help with tougher cleaning tasks, we’re always here to assist. Whether you need a deep cleaning or specialized services, you can count on us. For more details on our services, check out Commercial Cleaning Services or Additional Cleaning Services.
Ready for a cleaner home? Contact us today, and we’ll take care of the rest!
As a pet owner, you know how hard it can be to keep your home clean with all the pet hair, odors, and messy paw prints. It often feels like you’re constantly cleaning, right? But here’s the good news – having pets doesn’t mean your home has to be a mess. With the right cleaning services, you can keep your home fresh, clean, and healthy for both you and your pets.
In this blog, I’ll explain how the best cleaning services for pet owners can help you. Let’s break it down.
Why Special Cleaning Services Are Important for Pet Owners
Pets can cause unique messes that regular cleaning just can’t handle. Pet hair, stains, and odors are tough to remove without the right equipment and cleaning skills. That’s where a cleaning service designed for pet owners comes in.
When you hire a cleaning service that knows how to handle pet-related messes, you’re not just getting a clean house. You’re also creating a healthier environment for you and your pets. Pet hair and dander can trigger allergies, and bad odors can affect the air quality in your home. Professional cleaning services can help you manage these issues.
Why Our Cleaning Service Is Perfect for Pet Owners
At Gloria Cleaning, we specialize in cleaning homes for pet owners like you. Here’s how we do it:
Pet Hair Removal: We use powerful vacuums that are great at picking up pet hair from your carpets, furniture, and floors. This helps keep your home free from pet dander, which can trigger allergies.
Odor Control: Pets can leave some tough odors behind. We use special products that neutralize pet smells, leaving your home smelling fresh.
Stain Removal: Pets sometimes have accidents. We use professional-grade cleaning techniques to remove stains from pet urine, vomit, and other messes, helping restore your carpets and furniture.
Upholstery Cleaning: Pets love lounging on the couch, but their hair and dirt can get trapped in the upholstery. We provide deep cleaning to keep your furniture clean and fresh.
Safe, Eco-Friendly Products: We know that you want to keep your pets safe, so we use non-toxic, eco-friendly cleaning products. They’re tough on dirt but gentle for your pets.
Why You Should Get Regular Professional Cleaning
Regular cleaning isn’t just about looks – it’s about keeping your home healthy. Here’s how regular cleaning helps:
Better Air Quality: Pet hair and dander can pollute the air in your home, leading to allergies or breathing issues. Regular cleaning helps reduce allergens and keeps the air in your home fresh.
Prevents Mold and Mildew: Pets can leave water bowls or damp paws that might cause mold or mildew. Our cleaning services include making sure those areas stay dry and clean.
Keeps Carpets and Furniture Looking New: Pets can cause wear and tear on your furniture and carpets. Regular cleaning helps protect your belongings and keeps them in good shape for longer.
Our Cleaning Services for Pet Owners
At Gloria Cleaning, we offer several cleaning services that are perfect for homes with pets. Whether you need a one-time deep clean or regular service, we’re here to help. Here are some services we provide:
Tips for Keeping Your Home Fresh Between Cleanings
While we take care of most of the hard work, here are a few things you can do to keep your home fresh in between cleaning services:
Vacuum Often: Get a vacuum that’s designed to pick up pet hair. This helps keep your floors and furniture cleaner between professional cleanings.
Wash Pet Bedding: Clean your pet’s bedding and toys regularly to avoid odors and dirt buildup.
Use Air Purifiers: An air purifier can help remove pet dander and keep the air fresh.
Ready for a Cleaner, Healthier Home?
At Gloria Cleaning, we understand the challenges of being a pet owner, and we’re here to help you keep your home fresh, clean, and healthy. Let us do the cleaning, so you can spend more time enjoying your pets.
Get in touch with us today for a cleaning that fits your needs and gives you a fresh start!
To learn more about our services, check out our pricing page or get a personalized quote.
Cleaning your fan doesn’t have to be hard or time-consuming. If you want to keep your fan working well and looking clean, you can do it without taking it apart. Whether it’s a ceiling fan, desk fan, or standing fan, dust can pile up quickly and make it harder for the fan to work. As a professional cleaner, I’m here to show you simple ways to clean your fan, step by step. Let’s get started!
Why You Should Clean Your Fan
Fans help keep the air moving in your home, especially when it gets warm. But if you don’t clean them, dust and dirt can build up on the blades and the grill. This can make your fan less effective and can affect the air quality in your home. Regularly cleaning your fan helps it run better and keeps the air cleaner.
How to Clean a Fan Without Taking It Apart
Here’s how I clean a fan quickly and easily, without having to take it apart.
1. Turn Off and Unplug the Fan
Before you start, always make sure the fan is turned off and unplugged. This keeps you safe while cleaning and ensures the fan doesn’t turn on by accident.
2. Use a Pillowcase to Dust the Blades
A cool trick for cleaning fan blades is using an old pillowcase. Here’s how you can do it:
Drape the pillowcase over one of the fan blades.
Gently wipe the blade, letting the dust collect inside the pillowcase.
Repeat this for each blade. The pillowcase traps the dust so it doesn’t fall all over the floor.
3. Clean the Grill with a Vacuum
Most fans have a grill that gets dusty. To clean it without taking the fan apart:
Use a vacuum cleaner with a brush attachment to suck up the dust from the grill.
If there’s still some dirt left, use a microfiber cloth to gently wipe down the grill. This will keep it clean without scratching the surface.
4. Wipe the Fan’s Base and Stand
Don’t forget about the fan’s base and stand! Use a damp cloth to wipe these areas and remove any dust or dirt. Be careful not to get water near the motor.
5. Clean the Motor Area (If You Can Reach It)
If the motor area is easy to access, you can use a can of compressed air to blow out the dust. This helps prevent dirt from affecting the fan’s performance. Just make sure not to get any cleaning solution or water in the motor.
6. Plug the Fan Back In and Test It
Once you’ve cleaned everything, plug the fan back in and turn it on. You should feel the air moving better, and the fan should sound quieter and smoother.
Extra Tips for Keeping Your Fan Clean
Clean Regularly
The more often you clean your fan, the less dust it will collect. Try to clean your fan at least once a month. If your home gets extra dusty, you might need to clean it more often.
Use an Air Purifier
If you want to reduce dust and allergens, you could use an air purifier in the room. This can help keep the air fresh and reduce how often you need to clean the fan.
Consider Hiring a Professional Cleaner
If you don’t have the time or just want to make sure your fan gets a deep clean, professional cleaning services like Gloria Cleaning can help. We offer residential cleaning and other cleaning services to make sure your home stays fresh and dust-free. You can easily schedule a cleaning or get a quote from us!
Why Choose Gloria Cleaning?
At Gloria Cleaning, we provide high-quality cleaning services for homes and businesses. Whether it’s cleaning your fan, your whole house, or an office space, we have the tools and experience to do the job right. We specialize in surface and detail cleaning, ensuring your home is spotless. If you need a move-in/move-out cleaning or any other cleaning service, we can help!
Conclusion
Cleaning your fan doesn’t have to be complicated. By following these simple steps, you can keep your fan in great shape without taking it apart. Regular cleaning helps your fan work better and keeps your home air fresh.
If you’d rather have someone else handle it, Gloria Cleaning is here to help with professional cleaning services. Contact us today to schedule your cleaning! We’re always here to keep your home clean and fresh.
Cleaning the ceramic tiles in your shower might seem easy, but it can get tricky with all the soap scum, hard water stains, and mold that builds up over time. But don’t worry! As someone with years of experience in cleaning, I’m here to show you how to get your shower tiles looking fresh and shiny again. Let’s break it down into easy steps!
Why Cleaning Your Ceramic Tiles Matters
Ceramic tiles are a great choice for showers because they last a long time and look nice. But, they can get dirty quickly due to soap scum, water stains, and even mold. Regularly cleaning your tiles not only helps them look better but also keeps your bathroom healthier by stopping mold and mildew from growing.
Step-by-Step Guide to Clean Ceramic Tile in the Shower
Here’s how you can clean your shower tiles and grout to make them sparkle!
1. Gather Your Cleaning Supplies
You don’t need fancy cleaners to clean your tiles. Here’s what you’ll need:
Baking soda – Works as a gentle scrubber.
White vinegar – Helps remove stains and disinfects.
Microfiber cloth or a soft sponge – For scrubbing.
Warm water – For rinsing.
2. Start With Rinsing
First, rinse the tiles with warm water. This will help loosen up the dirt, soap scum, and grime. It will also make cleaning easier.
3. Scrub the Soap Scum
Soap scum is a common problem in showers. To clean it, make a paste with baking soda and water. Apply the paste to the areas where you see soap scum, then scrub gently with a sponge or cloth. Wipe it off with warm water when done.
4. Remove Hard Water Stains with Vinegar
Hard water stains can build up on your tiles. To clean them, pour some white vinegar into a spray bottle and spray it over the stained areas. Let it sit for 10-15 minutes. Afterward, wipe it off with a damp cloth. If the stains are still there, repeat the process until they disappear.
5. Tackle the Grout
The grout between your tiles can get dirty too. To clean it, make a paste with baking soda and water, and apply it to the grout lines. Use an old toothbrush to scrub the grout. Once you’ve scrubbed it clean, rinse everything with warm water.
6. Rinse and Dry the Tiles
Once you’ve cleaned all the tiles and grout, rinse everything with warm water to remove any cleaner or residue. After rinsing, dry the tiles with a microfiber cloth to avoid water spots.
Tips for Keeping Your Shower Clean
Prevent Soap Scum Buildup
One easy way to keep your tiles looking good is to prevent soap scum from building up. After each shower, use a squeegee or towel to wipe down the tiles. This helps stop soap scum from collecting and keeps your shower cleaner longer.
Stop Mold and Mildew
Mold and mildew thrive in damp, dark areas like showers. To prevent them, always run the exhaust fan while you shower and leave it on for a while afterward. If possible, open a window to keep the area ventilated.
Use a Daily Cleaner
If you want to keep your tiles looking shiny every day, use a quick spray of daily cleaner. You can either buy a cleaner from the store or mix a little white vinegar with water and spray it on the tiles after every shower. It helps keep the tiles fresh and prevents dirt from building up.
Why Hire a Professional Cleaner?
While cleaning your shower tiles is something you can do yourself, sometimes it’s best to leave the job to the professionals. At Gloria Cleaning, we specialize in detailed cleaning services like residential cleaning, surface cleaning, and more. If you need help with your shower or any other area of your home, we’re here to make your life easier.
Final Thoughts
Cleaning ceramic tiles in the shower doesn’t have to be hard. By following these simple steps and keeping up with regular maintenance, you can keep your tiles looking clean and shiny for a long time. And if you ever need a little extra help, you can always count on Gloria Cleaning to do the job right.
If you need more tips or want to schedule a cleaning, feel free to contact us today! We’re always here to help keep your home fresh and clean.
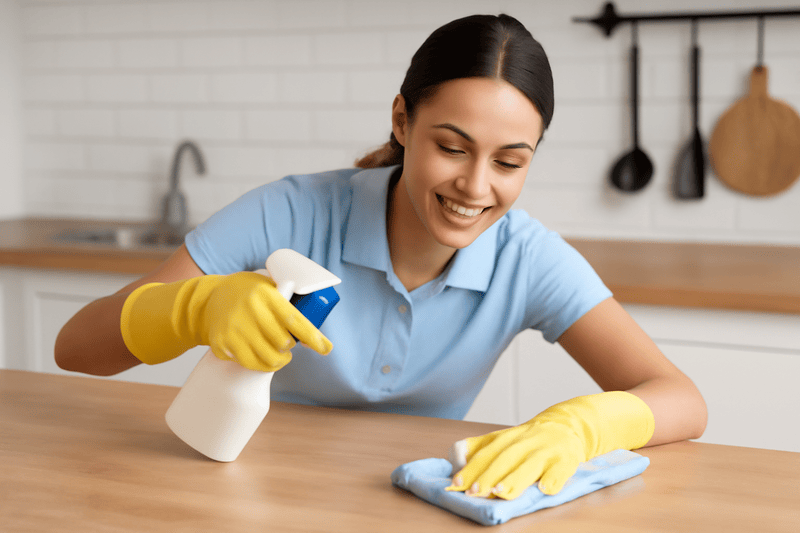
As a professional cleaner and owner of Gloria Cleaning, I know that deep cleaning is one of the best ways to keep your home or office clean and healthy. It’s more than just cleaning the surfaces; it’s about getting into all the hidden places and making sure everything is spotless.
What Is Deep Cleaning?
Deep cleaning means cleaning your space from top to bottom, including areas that are often missed during regular cleaning. It goes beyond dusting and vacuuming; it includes cleaning floors, baseboards, appliances, and even the areas behind furniture.
1. Keeps You Healthier
Deep cleaning helps get rid of germs, dust, and allergens that are hidden in your space. Regular cleaning can’t reach everything, but deep cleaning makes sure to clean the spots where dust mites, bacteria, and mold can grow. This is especially important for people with allergies or breathing problems. If you run a daycare or a hospital, keeping your space clean is super important to make sure everyone stays healthy. You can trust our daycare cleaning or hospital cleaning services for a safe, clean space.
2. Helps Your Things Last Longer
Deep cleaning protects your home or office by keeping things like carpets, floors, and furniture looking good for longer. Regular cleaning helps, but deep cleaning removes all the dirt and dust that can cause wear and tear. For example, our upholstery cleaning service helps keep your furniture looking brand new.
3. Makes Your Space Look Great
After a deep clean, your space will look fresher and brighter. Shiny floors, clean counters, and spotless bathrooms can make your home or office feel welcoming and comfortable. This is especially important when moving into a new place or preparing for a big event. If you need help with this, check out our post-construction cleaning or pre-post-event services to get your space ready for guests.
4. Reduces Stress and Increases Productivity
Living or working in a dirty, cluttered space can cause stress and make it harder to focus. A clean space can make you feel relaxed and productive. Our office cleaning services, including government facility cleaning, help create a clean and productive environment.
5. Gets Rid of Hidden Problems
Even if your home looks clean, there might be hidden problems. Deep cleaning gets into places that are often ignored, like under furniture, inside air vents, or behind appliances. These areas can hide mold, dust, and other things that may harm your health. Deep cleaning helps prevent these issues.
6. Uses Safe Products
We also use eco-friendly cleaning products that are tough on germs but safe for the environment. At Gloria Cleaning, we believe in using products that are safe for both your home and the planet.
Conclusion
Investing in deep cleaning will keep your home or office healthier and looking good for longer. Whether you need residential cleaning, office cleaning, or services like post-construction cleaning or trauma cleaning, deep cleaning covers all the places that regular cleaning misses. It’s not just about looking good—it’s about creating a healthier space for everyone.
If you’re ready to get your space cleaned the right way, contact Gloria Cleaning. We’ll make sure your property is sparkling clean and safe for everyone.
Have you ever noticed how a clean home makes you feel better? It’s not just about how your house looks. A clean home can actually improve your mental wellness and physical health. In this post, I’m going to show you how cleaning your home can positively affect both your mind and body.
How a Clean Home Helps Your Mind
1. Less Stress and Anxiety
When your home is messy, it’s hard to relax. The clutter can overwhelm you, making it difficult to focus or feel calm. Your mind is constantly processing the mess, even when you want to unwind.
But when your home is tidy, it’s much easier to feel peaceful. A clean home helps reduce stress and allows you to focus on the things that matter most. Organizing your space can feel like a mental reset, giving you a break from all the clutter. If you’re feeling stressed out, our residential cleaning services can help create a space where you can relax.
2. Boosts Your Mood
A clean home is often linked to a happier mindset. When you take care of your space, you’re showing yourself that you matter, which boosts your mood. When everything is in its place, it’s easier to feel proud of your environment.
Having a clean home also makes it more enjoyable to host family and friends. A neat space encourages connection and positivity, and spending time with loved ones in a clean space can leave you feeling more joyful.
How a Clean Home Helps Your Body
1. Better Air Quality and Fewer Allergies
Did you know that dust, pet hair, and other allergens can affect your breathing? When these things build up in carpets, couches, or corners, they can trigger allergies or worsen asthma. Regular cleaning—like vacuuming carpets, wiping surfaces, and washing bedding—helps remove these particles, improving the air quality in your home.
A clean environment reduces the amount of dust and allergens floating around, making your space healthier to breathe in. To help keep your home allergen-free, consider scheduling our deep cleaning services, which target hard-to-reach areas where dust can build up.
2. A Better Night’s Sleep
A cluttered or messy bedroom can make it harder for you to fall asleep. When your space is disorganized, it can cause mental unrest, keeping you from fully relaxing. But when your room is clean and tidy, you’re more likely to sleep better.
A clean, calm space helps you unwind after a long day and get a more restful night’s sleep. If you want to enhance your bedroom environment, consider our spring cleaning services to freshen up your sleep space.
3. Fewer Germs and Illness
Cleaning regularly helps eliminate germs and bacteria that can spread illness. High-traffic areas, like kitchens and bathrooms, need special attention to prevent germs from taking over. By regularly cleaning surfaces and disinfecting, you can reduce the risk of sickness.
Additionally, keeping your home free from mold and mildew is key to preventing respiratory issues. To ensure your space is safe and germ-free, our mold removal services are available to address hidden mold and mildew problems in your home.
Long-Term Benefits of a Clean Home
A clean home doesn’t just improve your well-being today—it can also make a positive impact on your future health. Regular cleaning helps you stay on top of a routine and build healthy habits. It can also improve other areas of your life, like eating better or staying more active.
By maintaining a clean environment, you’re preventing future health issues that can arise from living in an unsanitary space. It’s not just about today—it’s about creating a long-lasting healthy lifestyle.
Conclusion: A Clean Home Equals a Healthy Home
A clean home is more than just visually appealing—it contributes to better mental wellness and physical health. From reducing stress and boosting your mood to improving air quality and sleep, the benefits are clear. Regular cleaning can help you feel better, both inside and out.
If you’re ready to experience the benefits of a clean home, don’t hesitate to reach out. Explore our full range of cleaning services to find the perfect solution for your home and get started on your way to a healthier living space.
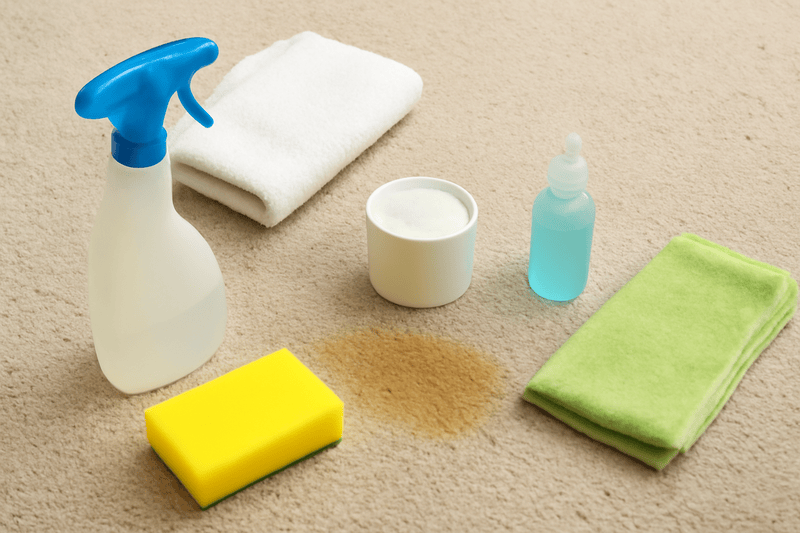
As a cleaning professional, I understand how frustrating it can be when your pet leaves a stain on your carpet. Whether you have a playful puppy or a curious kitten, accidents happen. The good news is that with the right tools and methods, you can get your carpet looking clean again. In this guide, I’ll show you how to remove pet stains from your carpet step by step, using easy-to-follow tips that work.
Why Pet Stains Are a Big Problem
Pet stains are more than just an eyesore. They can also leave behind bad smells and can damage your carpet if not cleaned properly. Pet urine contains proteins and acids that can seep deep into the carpet fibers, leading to stains and unpleasant odors. So, it’s important to clean them up quickly and effectively.
How to Remove Pet Stains from Carpet
1. Blot the Stain (Don’t Rub!)
The first thing you need to do is blot the stain with a clean cloth or paper towel. Don’t rub it – this can make the stain worse by pushing it deeper into the carpet. Keep blotting until most of the liquid is absorbed.
2. Use an Enzyme Cleaner
Enzyme-based cleaners are great for breaking down the proteins and acids in pet urine. These cleaners are designed to eliminate both stains and odors. Spray the cleaner on the stain and let it sit for about 10-15 minutes. After that, blot the area with a clean cloth to remove the solution.
3. Try a Baking Soda Solution
If you prefer to use natural cleaners, baking soda is a great choice. Mix a tablespoon of baking soda with a cup of warm water and a few drops of dish soap. Apply this to the stain and let it sit for 10-15 minutes. After it soaks in, blot it with a clean cloth. Baking soda helps remove odors, so your carpet will smell fresh.
4. Vinegar and Water Solution
Another natural solution is mixing vinegar and water. Use one part white vinegar and two parts water, and spray it onto the stain. Let it sit for a few minutes, then blot it with a cloth. The vinegar will help break down the stain and neutralize any odors.
5. Rinse and Dry
After you’ve cleaned the stain, rinse the area with clean water to get rid of any leftover cleaning solution. This will prevent residue from attracting more dirt. Once you’ve rinsed the area, use a towel to blot up as much moisture as possible. You can also speed up drying by using a fan or opening a window.
6. Vacuum and Freshen Up
Once the carpet is dry, vacuum the area to pick up any remaining dirt. If the smell still lingers, sprinkle baking soda over the area, let it sit for 15-20 minutes, and then vacuum again.
Tips to Prevent Pet Stains in the Future
While it’s important to know how to remove pet stains, it’s also a good idea to take steps to prevent them:
Train Your Pet: Proper pet training can help prevent accidents on your carpet.
Use Rugs or Mats: Place mats in areas where your pet spends a lot of time to catch spills before they hit your carpet.
Regular Carpet Cleaning: Have your carpet cleaned professionally every once in a while to keep it in good shape.
Why Choose Gloria Cleaning for Pet Stain Removal
At Gloria Cleaning, we specialize in carpet cleaning and pet stain removal. Our team uses eco-friendly products and high-quality equipment to ensure that your carpet looks and smells great. If you’re struggling with tough pet stains, give us a call – we’re here to help!
Removing pet stains from your carpet doesn’t have to be hard. With the right tools and steps, you can remove stains and odors and keep your carpet looking fresh. If you need help or just don’t have the time to do it yourself, remember that the experts at Gloria Cleaning are just a call away!
When it comes to cleaning, there are a lot of myths that can make things confusing. As the owner of Gloria Cleaning, I’ve heard many of these myths, and it’s time to clear them up. In this blog, I’m going to share the top five cleaning myths and tell you the truth about them. This will help you understand why professional cleaning is so important.
Myth 1: Professional Cleaners Just Use Fancy Products
A lot of people think professional cleaners only use expensive products that anyone can buy. While we do use high-quality products, the real value of a professional cleaner is in the skills and experience we bring. We know how to use cleaning products the right way to get the best results without causing damage.
For example, when we clean carpets, we use special cleaners that are safe for the fabric and remove stains better than regular store-bought products. The right tools and techniques make all the difference!
Some people believe that cleaning their own home is a good way to save money. But when you think about it, cleaning takes time and energy. Plus, you have to buy cleaning products. Professional cleaners can do the job faster and better because we have the right tools and knowledge. So, in the long run, hiring a cleaner can actually save you money.
Myth 3: You Only Need to Clean When It Looks Dirty
Many people think they only need to clean when they can see dirt or dust. But that’s not true! Professional cleaners know that dirt and dust can build up in places you can’t see, like inside carpets or on air vents. Regular cleaning helps keep your home healthy and prevents problems later, like allergies or damage to your furniture.
Myth 4: You Don’t Need a Professional for Small Spaces
Some people think professional cleaners are only needed for big homes or offices. But even small spaces need cleaning! In fact, small spaces can get dirty faster and need more attention. Professional cleaners know how to clean every corner, even in small apartments or rooms. We make sure that everything is spotless, no matter the size of the space.
Myth 5: Professional Cleaners Only Do Basic Cleaning
A lot of people think that professional cleaners only do basic tasks like vacuuming and dusting. But we do much more than that! We offer deep cleaning, sanitation, and even special services like cleaning windows, removing pet odors, and dealing with mold. Professional cleaning can be customized to your needs, so you get exactly what you need.
Why Choose Gloria Cleaning?
At Gloria Cleaning, we want to help you understand the truth about cleaning. We’re experts in our field, and we take pride in delivering exceptional service. Whether you need a deep cleaning, regular cleaning, or just a little extra help, we’re here to make your home or office look and feel great.
Our team is trained, reliable, and ready to tackle any job. We use safe, effective products and proven cleaning methods to make sure your space is cleaned properly.